
Friday, October 12, 2012

Tuesday, September 4, 2012
Easy Tilt Shift Effect in Photoshop
Working on the printing side of graphic design has forced me to come in contact with images of varying quality. Most designers prefer to use high quality images taken by professional photographers. I have received so many files from customers who either can't afford high quality professional photographs, or believe that they can take photographs that are just as good as the professionals'. I have learned to get very creative with images that are fuzzy, out of focus, or grainy in order to be able to use them in a professional looking design. 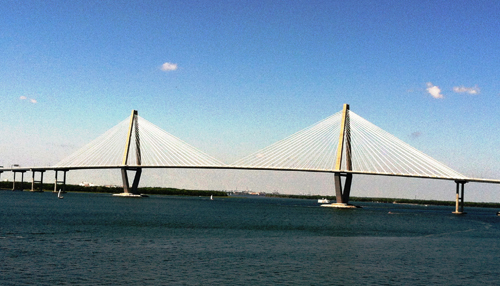
For example, I received the photograph above to use on a brochure and business card design. The image was high resolution, however the camera used was not a professional grade digital camera, resulting in a very grainy image. In order to be able to use the image, I took the following steps. First I erased the clouds to make the sky more uniform. Making the sky uniform enabled me to use a blur effect (under filters in Photoshop) to lose the graininess in the photograph. I then wanted to make the photo "pop". A while back, I stumbled upon a very cool technique called tilt shift photography used to make photographs appear to be images of miniature items. Below is a link to give you an idea of what tilt shift photography is
http://www.smashingmagazine.com/2008/11/16/beautiful-examples-of-tilt-shift-photography/
I learned that by attempting to recreate the tilt shift effect on low quality photos, the finished image gave the illusion of being a high quality professional image.
Below is the photograph after I added the effects.


Some photographs do not look good with this effect applied. The photograph should be taken from a long distance, and should be taken from a high angle in order to achieve the miniature effect that the tilt shift technique is so famous for. The photograph I used above was not taken from a high angle which made the effect subtle, but the use of the effect covered up the grainy quality of the photograph allowing me use it in a professional looking design.
For example, I received the photograph above to use on a brochure and business card design. The image was high resolution, however the camera used was not a professional grade digital camera, resulting in a very grainy image. In order to be able to use the image, I took the following steps. First I erased the clouds to make the sky more uniform. Making the sky uniform enabled me to use a blur effect (under filters in Photoshop) to lose the graininess in the photograph. I then wanted to make the photo "pop". A while back, I stumbled upon a very cool technique called tilt shift photography used to make photographs appear to be images of miniature items. Below is a link to give you an idea of what tilt shift photography is
http://www.smashingmagazine.com/2008/11/16/beautiful-examples-of-tilt-shift-photography/
I learned that by attempting to recreate the tilt shift effect on low quality photos, the finished image gave the illusion of being a high quality professional image.
Below is the photograph after I added the effects.
Easy Tilt Shift Effect - Photoshop CS5
Step 1 - Use the box selector or ellipse selector to select 60 to 80% of the image
The shape you use is entirely up to you. I prefer the rectangle, but some photos might require the use of the elliptical selector.Step 2 - Feather the selection.
This step is taken to ensure the selection area does not have a straight edge to it. Usually with a high resolution photo I choose to feather by 100-200 pixels, sometimes more.
Step 3 - Inverse your selection
Only the outer edges of the image should be selected.

Step 4 - Apply a Lens Blur
Select the "Filter" option in Photoshop, then "Lens Blur". Adjust the blur to any settings that you prefer, the image will preview using the settings that are selected making it easy for you to choose the blur that is right for you.

Voila... you have added a quick tilt shift effect to a photograph in 4 simple steps!
Wednesday, August 1, 2012
CARTA New Dorchester Rd. Express Route on the Behance Network
One of my latest designs as posted on Behance Network:
CARTA New Dorchester Rd. Express Route on the Behance Network
CARTA New Dorchester Rd. Express Route on the Behance Network
Thursday, June 28, 2012
Wednesday, June 27, 2012
The Difference Between Web Design and Search Engine Optimization
I recently ran into an issue with a customer that I believe many web designers have run into. I offered them a website design that I had previously designed for another customer that was live for about a year. I offered it to them at a very low cost since they are a very small start-up business, and all I had to do was change the name and logo for the company. Once the site went live, the customer has incessantly called me about why their page is not ranked higher in Google, and why they are not getting phone calls and emails from the website yet. I am having a hard time explaining to them that search engine optimization is a completely different field from website design and that they will have to pay extra for the extra work that it involves. Most people don't realize just how time consuming SEO really is. Search engine optimization requires least 30 minutes a day dedicated to each website that you administer to.
Why is search engine optimization so time consuming? Each search engine that you use such as Google, Yahoo and Bing have their own algorithm (an algorithm is a very complicated math equation) to rank each website according to the search term that a person types into the search box. For example, when someone goes to Google.com looking for a printing company in Charleston, South Carolina, they type in the terms that make the most sense to them, such as "color printing company in Charleston SC". What most people don't realize is that the search term they think is the most logical, is not the same term that the person sitting next to them would choose. The person sitting next to them may use a more specific search, such as "booklet printers in Charleston SC" or "Where can I send a booklet for printing in Charleston SC?". With so many word combinations available, how do the search engines such as Google, Yahoo and Bing, rank each website for each set of keywords? Google, Yahoo , Bing and other search engines crawl each website and log every word that is on every page of every website. Using specified standards calculated using their algorithm, they rank the page for each search that is typed into the search box on their home page according to keyword density, correct page coding, page load time, etc. There are thousands of variables that each search engine tracks for every website. The algorithms are not public information and each search engine is very secretive about out what the right combination of design elements and content will achieve a high ranking. That is where search engine optimization comes in and why it is such a time consuming job. Since key word combinations vary from person to person and search to search, it is not effective to target only one set of keywords on your website. Search engine optimization should target multiple key word searches.
Keywords are not the only factor taken into consideration by search engines. Below are a few other factors that some search engines look at when ranking your website
SEO is a delicate balancing act of trial an error, and for every search engine that you achieve a top ranking, your ranking may drop on other search engines since each one looks for different criteria. There are thousands of criteria to pay attention to when trying to optimize your website for search engines.
Any search engine optimization specialist will try to tell you that they know exactly the right word combinations to use, that it is easy and that they can get you new business in a matter of days. Don't let them fool you. None of the search engines available today have given us a straight answer as to what the key is to writing the perfect website for high ranking, so it is still trial and error. There are some general rules you can stick to that usually work, but each search engine is constantly updating and changing their algorithm and criteria to keep designers from monopolizing specific searches, which is the main reason why search engine optimization is so time consuming. It can also take up to a month or more to get your website ranking changed or even recognized by the search engines.
Update 7-13-2012:
I just found this site that explains everything I wrote above in much easier terms! www.stepforth.com Common Seo Questions
Why is search engine optimization so time consuming? Each search engine that you use such as Google, Yahoo and Bing have their own algorithm (an algorithm is a very complicated math equation) to rank each website according to the search term that a person types into the search box. For example, when someone goes to Google.com looking for a printing company in Charleston, South Carolina, they type in the terms that make the most sense to them, such as "color printing company in Charleston SC". What most people don't realize is that the search term they think is the most logical, is not the same term that the person sitting next to them would choose. The person sitting next to them may use a more specific search, such as "booklet printers in Charleston SC" or "Where can I send a booklet for printing in Charleston SC?". With so many word combinations available, how do the search engines such as Google, Yahoo and Bing, rank each website for each set of keywords? Google, Yahoo , Bing and other search engines crawl each website and log every word that is on every page of every website. Using specified standards calculated using their algorithm, they rank the page for each search that is typed into the search box on their home page according to keyword density, correct page coding, page load time, etc. There are thousands of variables that each search engine tracks for every website. The algorithms are not public information and each search engine is very secretive about out what the right combination of design elements and content will achieve a high ranking. That is where search engine optimization comes in and why it is such a time consuming job. Since key word combinations vary from person to person and search to search, it is not effective to target only one set of keywords on your website. Search engine optimization should target multiple key word searches.
Keywords are not the only factor taken into consideration by search engines. Below are a few other factors that some search engines look at when ranking your website
- Ensure that your website is built with correct code.
- Minimize heavy design elements that take a long time to load.
- Update your site on a regular basis.
SEO is a delicate balancing act of trial an error, and for every search engine that you achieve a top ranking, your ranking may drop on other search engines since each one looks for different criteria. There are thousands of criteria to pay attention to when trying to optimize your website for search engines.
Any search engine optimization specialist will try to tell you that they know exactly the right word combinations to use, that it is easy and that they can get you new business in a matter of days. Don't let them fool you. None of the search engines available today have given us a straight answer as to what the key is to writing the perfect website for high ranking, so it is still trial and error. There are some general rules you can stick to that usually work, but each search engine is constantly updating and changing their algorithm and criteria to keep designers from monopolizing specific searches, which is the main reason why search engine optimization is so time consuming. It can also take up to a month or more to get your website ranking changed or even recognized by the search engines.
Update 7-13-2012:
I just found this site that explains everything I wrote above in much easier terms! www.stepforth.com Common Seo Questions
Friday, April 13, 2012
CONVERT COREL DRAW FILES ONLINE - Free Online File Conversion Services | Filespazz.com
CONVERT COREL DRAW FILES ONLINE - Free Online File Conversion Services | Filespazz.com
Just helped out a friend with this handy tool. It will convert Corel Draw files to just about any file type you want. I converted to a Photoshop file. It came back at 300dpi, the only issue was that the margins seemed to be missing, but that was an easy fix!
Just helped out a friend with this handy tool. It will convert Corel Draw files to just about any file type you want. I converted to a Photoshop file. It came back at 300dpi, the only issue was that the margins seemed to be missing, but that was an easy fix!
Thursday, March 15, 2012
What is a "Bleed"?
Have you ever been completely baffled when your printer asks you to re-send your
artwork with a “bleed” included? I was confused the first time that I
sent a file to a printing company too. Luckily, I was working with a
company that took the time to explain what a bleed is to me so that I
wouldn’t make the same mistake twice. I know that most printers won’t
take the time to explain it to you, so here is my attempt at changing
the pre-press attitudes that have prevailed in the past. Whenever you
have a page that has images you want to “fall off the edge of the page”
you must include a bleed on your document. A bleed is an extra 1/8” or
1/4” added on the outside of your main document in which those pictures
“bleed” onto. The extra space will ultimately be trimmed off, however
adding the extra room allows for a wider margin of error for when your printer
attempts to trim your printed piece. Why do they need this extra margin of
error? I know, they should be masters at cutting by now, but what most
people don’t understand is that we stack all of the documents on top of
each other after they are printed, and cut them all at once to ensure
that the pieces are trimmed to the same size. This is an excellent
practice, however there is a margin of error that is created by cutting
them all at once. The bottom and top of the pile, even though we clamp it down as
hard as we can, sometimes stretches and moves during the cutting
process. Having the images bleed over the edge of where you want us to
trim the piece, means that if those pages stretch and move even just the
slightest bit, you and your end user of your printed piece will not
notice. If the image did not bleed and we attempted to trim the piece to
the size you requested, the top one may look great, but once you got to
the bottom piece, there would be a bit of white paper showing on the
edge making your document look un-professional.

Including the proper bleed on your document is easy in most instances. With InDesign you can set your bleed in the “Document Setup” dialog box. With Quark you just have to click on >Window >Guides >Create Bleed and Safety Guides. With Illustrator, Publisher, and Photoshop you will have to do some fancy footwork. With all 3 of those programs you will have to set your page size to be larger than the actual trim size that you want. So for an 8.5x11” letter size page, if you want to add a 1/8” bleed to it you will have to set your page size to 8.75”x 11.25”. 1/8” bleed on both sides adds up to adding an extra .25” to both dimensions of your page. If you are using any other programs to design your documents, then good luck I can’t help! I hope this explains why we ask for a bleed to be included on the documents you send to your printer. Oh and don't forget to set your bleeds in the "Marks and Bleeds" dialog box when you create your press ready .pdf file!
Including the proper bleed on your document is easy in most instances. With InDesign you can set your bleed in the “Document Setup” dialog box. With Quark you just have to click on >Window >Guides >Create Bleed and Safety Guides. With Illustrator, Publisher, and Photoshop you will have to do some fancy footwork. With all 3 of those programs you will have to set your page size to be larger than the actual trim size that you want. So for an 8.5x11” letter size page, if you want to add a 1/8” bleed to it you will have to set your page size to 8.75”x 11.25”. 1/8” bleed on both sides adds up to adding an extra .25” to both dimensions of your page. If you are using any other programs to design your documents, then good luck I can’t help! I hope this explains why we ask for a bleed to be included on the documents you send to your printer. Oh and don't forget to set your bleeds in the "Marks and Bleeds" dialog box when you create your press ready .pdf file!
Subscribe to:
Posts (Atom)